

Heute gibt es eine schöne, mit vielen Bildern ausgestattete Anleitung für euch. Ich habe bereits vor drei Jahren diese Blätter entworfen, allerdings in einem sehr kleinen Format. Meine Mutter kam letztes Jahr auf mich zu und fragte, ob ich ihr einen weiteren Tischläufer, nicht breiter als 25 cm, nähen kann, ein herbstliches Motiv wäre sehr schön.
Ok. Ich habe mich hingesetzt und das Blättermotiv vergrößert und während des Nähens viele Bilder für eine Anleitung gemacht. Ein Jahr geht so schnell vorbei, daher präsentiere ich heute die lange versprochene Anleitung.
Heute beginnen wir mit dem Paper Piecing Teil der Blattspitze.
Dazu ladet euch bitte das PDF herunter und druckt es euch aus. Bitte beim Ausdrucken unbedingt beachten, dass bei den Druckeinstellungen "Benutzerdefinierte Einstellungen: 100 %" eingestellt sind.
Today I`ll show you how to sew these leaves. I made a tutorial while I sewed the leaves table runner for my mum. I´ve designed my own pattern to make these leaves but in a very small variation. Last year my mom aksed me if I would make her a new table runner. Something for autumn would be nice.
Ok I sat down at my desk and increased the pattern and I made a lot of pictures for a nice tutorial. It took nearly a yeat to finish the pattern for you, time is always running but here it is, the finished tutorial.
Today we start wit the paper piecing part of the leaf top.
Please download this PDF and print it out. Please take care to print them at 100 %.

Nach dem Ausdrucken bitte noch unbedingt einen Größencheck machen. Wir wollen ja auch die richtige Größe für die Vorlage haben. Hierfür messt einfach die Kontrollkästchen am unteren Rand nach. Wenn diese stimmen, dann könnt ihr mit dem Englisch Paper Piecing loslegen. (Da wir im Patchwork mit verschiedenen Maßeinheiten arbeiten, sind hier sowohl ein Inch und ein cm- Kontrollkästchen abgebildet).
After printing out the pattern be sure to check the size control. You want to have the right size for the pattern. Just meassure the small squares at the bottom of the paper. If they are ok you can start paper piecing. (we use different meassurements in Germany, so you can decide on inches or cm within this pattern)

Wir benötigen:
- 1 Paper Piecing Vorlage
- 1 farbiges Teil ca. 12,5 x 6 cm
- 2 Hintergrundteile ca. 6 x 11 cm
We need:
- 1 paper piecing template
- 1 colored piece of fabric meassuring about 5 x 2,5 inches
- 2 backgroundpieces about 4,5 x 2,5 inches
 |
| Benötigtes Material - materials you need |
1. Zuerst falten wir die Papiervorlage auf den Linien auf denen wir später nähen. Das gibt uns eine bessere Handhabung beim Nähen auf Papier.
1. Fold the paper on the sewing lines. It gives you more a guide to lay on the fabric later.
 |
| Schritt 1 - Step 1 |
2. Dann nehmen wir das farbigen Teil und legen es auf die Rückseite des Papiers. Im Gegenlicht kann man deutlich sehen, dass wir alle Kanten, inklusive dem grauen Teils der Nahtzugabe ausfüllen. Hier könnt ihr den Stoff mit einer Stecknadel fixieren.
2. Take the colored fabric piece and place it on the pack of the template. When you hold it against the light you can check that all parts we need are covered, even the grey part of the seam allowance. Fix it with a pin if you like.
 |
| Schritt 2 - Step 2 |
3. Now we fold the paper with the fabric again, to get a crease in the fabric piece to show us where our seam will go through. There we have to lay down our next piece of faric with the overlap for the seam allowance.
 |
| Schritt 3 - Step3 |
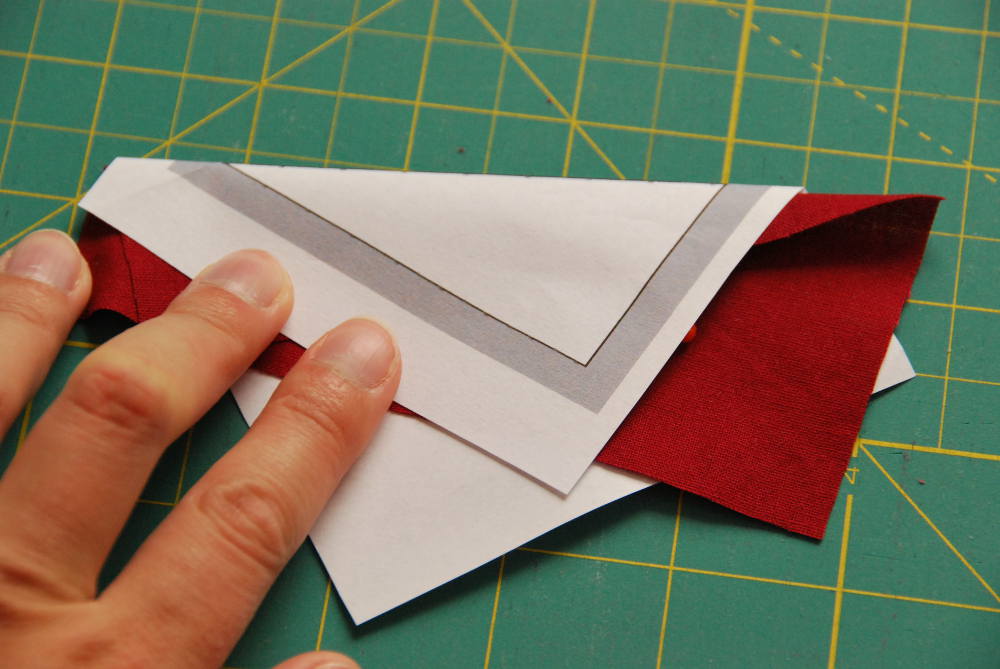
4. Legt den Hintergrundstoff mit ca. 0,5 cm Nahtzugabe über die Falte des farbigen Stoffs und faltet das ganze nochmal auf der Nahtkante. Jetzt könnt ihr sehen, wo ihr ca. nähen werdet. Dadurch könnt ihr einfach kontrollieren, ob ihr genügend Nahtzugabe gelassen habt oder nicht. Wenn alles passt, dann empfehle ich ungeübten Nähern die Nutzung von Stecknadeln, denn Stoff auf Papier rutscht sehr gerne hin und her.
4. Take the background fabric and place it down and give a quarter inch seam overlap for the seam allowance. Fold again on the sewing line. Now you can see where your seam will go and you can check if there is enough seam alowance for the background piece. Everythings ok now - use a pin to hold it in place. If you are an expert sewer you can leave the pins behind.
 |
| Schritt 4 - Step 4 |
5. Jetzt wird genäht. Beim Paperpiecing wird eine 2-er Stichlänge verwendet. Dadurch lässt sich das Papier am Ende leichter entfernen. Wir drehen unser geheftetes Stück so, dass die bedruckte Papierseite nach oben zeigt. Wir nähen genau auf der aufgezeichneten Kante. Wer möchte kann hier am Anfang und am Ende der Naht vernähen, bei diesem einfachen Muster ist das aber kein Muss, da diese Nähte in einer anderen Naht später verriegelt werden.
5. Time for sewing now. With the englisch paper piecing you will sew with a smaller stitchlength. I use the length 2. With the smaller stitches the paper will be perforated better and you will have less problems by removing it later. Now stitch exactly on the line. You can backstitch at the beginning and in the end if you like, but with this small pattern you will close the seam with the next steps later.
 |
| Schritt 5 - Step 5 |
6. Ist die Naht genäht, so sieht das ganze Konstrukt so aus. Kontrolliert hier bitte nochmals die Nahtzugabe auf der vollen Länge der Naht.
6. Seam finished? Your piece will look like this. Turn around to controll your seam allowance on the full length of the seam.
 |
| Schritt 6 - Step 6 |
7. Wir drehen es wieder um und lassen die bedruckte Seite der Vorlage nach oben schauen. Jetzt falten wir das Papier auf die Seite und schneiden entweder mit Schere oder Rollschneider die überstehenden Stoffstücke nach der Zugabe einer Nahtzugabe ab.
7. Turn around again and let the printed side look up. Now fold the paper away and cut the outstanding fabric, giving a quarter inch seam allowance. You can use a rotary cutter or siccors.
 |
| Schritt 7 - Step 7 |
8. Wir drehen das Teil wieder um und bügeln den Hintergrundstoff nach außen und stecken ihn fest. So kann er nicht in die nächste Naht hineinrutschen. Dann falten wir wieder und wiederholen die Schritte 3 bis 8 auf der zweiten Seite der Blattspitze.
8. We turn the piece again and give it a nice press and fix the fabric with a pin on the paper. With the pin it won`t get into the next seam. Then we fold on the next seam line and repeat Step 3 to 8 on the other side.
 |
| Schritt 8 - Step 8 |
The finished part will look very chaotic and unfinished:
 |
| Vorderseite - front |
Turn around again:
 |
| Rückseite - back |
9. Now take your ruler and trimm away the rest of the fabric with a quarter inch seam allowance. That is exactly the grey part.
 |
| Schritt 9 - Step 9 |
10. Now fold the paper sometimes to rip it off. If you have used the smaller stitch, it will get off very easy.
 |
| Schritt 10 - Step 10 |
That`s the way our finished leaf top looks like:

Und noch ein Bild von vorne. Das ist das schöne beim Paper Piecing. Jedes Teil wird gleich und es gibt klare und gerade Formen vor.
And a last picture from the front. I love the cean and crisp lines that comes with the paper piecing. Each piece gets out the same way and it is really an accurate methode.

So, ich hoffe, ich habe alles anschaulich erklärt und ihr habt Spaß mit dieser Anleitung. In den nächsten Tagen zeige ich Euch dann, wie ihr den Rest des Blattes dazu näht.
Schönen ersten herbstlichen Sonntag euch.
I hope I gave you a nice and easy pattern to sew and hope you will have fun trying out this pattern. Within the next days I`ll show you how to sew the rest of the leaf.
Have a fun and beautiful autumn sunday.
Keine Kommentare:
Kommentar veröffentlichen