Sonntag, 20. September 2015

Blätter nähen Teil 2 - Sew leaves part 2 (Tutorial)


Heute gibt es den zweiten Teil der Anleitung für den Tischläufer mit den Herbstblättern drauf.
Die Anleitung für die Englisch Paper Piecing Methode bei der Blattspitze findet ihr hier.

Viel Spaß beim nähen.
Hier ist sie:

Für ein Blatt in der Größe 17 cm im Quadrat braucht ihr:
- Paper-Piecing-Vorlage für die Blattspitze (PDF)
- Lineale
- Rollschneider
- Schere
- Bleistift oder einen auswaschbaren Stift
- Hintergrundstoff
- eine Auswahl an verschiedenen herbstlichen Farben


Today I`ll show you he second part of the tutorial on how to sew these autumn leaves. 
The tutorial with the englisch paper piecing methode for the leaf top can be found here.

Now have fun with sewing.
Here it is.

You need this stuff to make a leaf in 6 3/4 inch square:
- Paper-Piecing-pattern for the tipp of the leave (PDF)
- rulers
- rotary cutter
- siccors
- a water soluble pen
- backgroundfabric
- a bunch of colors you like to use for autumn (mine are orange, green, yellow and a dark red.)


Zuschneiden für die Blattspitze:
- von Hintergrundstoff 2 Rechtecke
- von der Farbe 1 Rechteck

Für den Rest des Blattes:
- 1 Quadrat in Farbe à 4 x 4 cm
- 6  Rechtecke in Farbe à 7 x 4 cm
- 6 Rechtecke in der Hintergrundfarbe à 7 x 4 cm
- 2 Rechtecke in der Hintergrundfarbe à 9 x 6 cm
- 1 Quadrat in der Hintergrundfarbe à 8 x 8 cm


Ihr beginnt mit der Paper-Piecing Vorlage. Diese wird mit zwei Hintergrundteilen und dem farbigen Teil benäht, mit Nahtzugabe ausgeschnitten und das Papier abgezupft.
Diese Anleitung sollte mit einer Viertel Inch Naht genäht werden. Das sind ca. 6 mm. Macht euch einen Tesa an die Maschine oder nutzt einen Quarter Inch Nähfuß. Wer diese Anleitung mit einer anderen Nahtzugabe näht, muss damit rechnen, dass das Blatt am Ende nicht zusammen passt.

Cutting for the leaf top, the square in the left corner with the brown top:
- 2 rectangles in your background color.
- 1 rectangle of the top color you want to use

For the rest of the leaf:
- one 1 5/8 x 1 5/8 " square in color 
- six rectangles in color 2 3/4 x 1 5/8 " 
- six rectangles in backgroundfabric 2 3/4 x 1 5/8 "
- two rectangles in backgroundfabric 3 5/8 x 1 5/8 "
- one square with backgroundfabrig 3 1/4 x 3 1/4 "


Please start with the Paper Piecing Part first. You are going to add two background pieces and one colored piece. Trimm down to size with seam allowence and ripp off the paper. 
Only use a quarter inch seam allowance. If not it can be possible that the leaf will not fit together.

Layout
Anschließend legt ihr die Stoffe so auf wie auf dem Bild zu sehen und legt die Plätze der Farben fest. Dadurch kann man auch sehen, ob man etwas vergessen hat zuzuschneiden.

Now layout the pieces like you see on the picture and choose the position of your colors. best time to check if you forgot to cut something.


Für den nächten Schritt nehmt alle farbigen Teile, wo auf diesem Foto der leere Platz mit "Links" beschrieben ist. Das sind die Teile, die an der linken Seite die lange Spitze bekommen.

Next step: take all the pieces where I note "Links" (translation=left) in the picture on the empty place. These are the pieces that get their long point on the left side.


Zu den farbigen Blattteil kommt ein Hintergrundteil. Dieses legt ihr Kante auf Kante wie im obigen Bild zu sehen auf den farbigen Teil. Mit einem Lineal und einem Stift markiert ihr diagonal die Nählinie von Ecke zu Ecke.
Auf dieser Linie näht ihr dann auch euer Teil zusammen. Wer möchte, kann diesen Schritt mit Stecknadeln fixieren.

Add a backgroundpiece to the colored one like it is shown in the picture above. Use a ruler and a water-soluble pen to mark your stich line diagonal from corner to corner. Stich a quick seam on this line. You can add pins to fix it while sewing.


Anschließend schneidet ihr das überschüssige "Dreieck" ab. Das könnt ihr mit dem Rollschneider machen oder mit der Schere, so wie ich. Bitte nur so viel abschneiden, dass ungefähr die Nahtzugabe 0,5 mm eingehalten wird. Gebügelt wird in Richtung Hintergrund.

Now trimm the corner. You can use siccsor or ruler and rotary cutter if you like to. Be sure to leave a quarter inch seam allowence. Iron towards the background.


Diese Schritte wiederholt ihr mit den drei übrig gebliebenen Teilen für die längere Spitze auf der rechten Seite. Hier den Hintergrund genau gegengesetzt annähen. Ebenfalls den überschüssigen Stoff abschneiden und eine Nahtzugabe stehen lassen. Ebenfalls Bügeln, aber diesmal in Richtung Farbe.

Repeat these steps with the pieces for with the long point on the right side. I wrote "rechts" (translation= right) in the empty places for the pieces that get the long right side. Piece the background in the opposite way like it is shown in the picture. This time you iron towards the color.


So sollte euer Blatt bis jetzt dann aussehen. Der größte Teil ist geschafft. Jetzt kommen die Zusammennäharbeiten, siehe Bilderfolge:

Now your leaf should look like this. The hard part is done. Now you need to assemble the block like you can see it in the following pictures:


1. Zuerst näht ihr die obere Reihe zusammen. Möglichst alles am unteren Rand orientieren. Danach näht ihr die schmalen Teile in Reihe zwei zusammen. In der Unteren, der dritten Reihe, zuerst Blöcke bilden.

2. Nach diesem Schritten seht ihr auf Bild 2 wie es aussehen sollte.

3. Bitte die Kanten wenn nötig etwas gerade abscheiden. Nicht zu viel abscheiden. Auf Bild drei seht ihr das Ergebnis dieses Schritts.

4. In Reihe drei bitte die beiden Blöcke zu einer Reihe verbinden.

5. Nun näht ihr, eine nach der anderen, die Reihen zusammen.

So sieht der Block anschließend aus. Nun an den zwei Quadraten, also dem "Nähen auf Papier-Quadrat" und dem Hintergrundquadrat das Lineal anlegen und den Block auf 17 cm zurückschneiden, sauberschneiden oder versäubern.

1. Sew the first row together. Try to sew a straight line on the under line of the row. Then you sew the thin line together. And in the end you sew the two blocks in the third row together.

2. After these steps yo see on the second picture how it should look like.

3. Please trimm down some edges if nessesary. Not to much. On picture three you can see how it should look like.

4. Sew the two block of row three together.

5. Now finish the block by sewing the rows together. Take care that all seams match together.

And that`s how the block should look like in the end. Now you can lay on your ruler on the leaftop you sewed with the epp-methode and trimm down the block to 6 3/4 inch.


Fertig ist euer Blatt.

Wer will kann beim Quilten dann entgegen der Blattspitze noch einen Stil quilten. Mit einem passenden Faden oder mit einem etwas dickeren Stickgarn kann man dann auch hier noch einen tollen Effekt erzielen.

Viel Spaß damit und schöne Herbstvorbereitungen;-)

Your leaf is finished.

Everybody who wants to have a leaf stalk with his leaf can add one while quilting the finished object. or you can stitch with a decoration thread and give it a great look.

Have fun with this tutorial and I wish you a great time preparing for autumn.

Sonntag, 6. September 2015

Einfaches Paper Piecing, Blätter Teil 1 - Easy paper piecing, leaves Part 1


Heute gibt es eine schöne, mit vielen Bildern ausgestattete Anleitung für euch. Ich habe bereits vor drei Jahren diese Blätter entworfen, allerdings in einem sehr kleinen Format. Meine Mutter kam letztes Jahr auf mich zu und fragte, ob ich ihr einen weiteren Tischläufer, nicht breiter als 25 cm, nähen kann, ein herbstliches Motiv wäre sehr schön.
Ok. Ich habe mich hingesetzt und das Blättermotiv vergrößert und während des Nähens viele Bilder für eine Anleitung gemacht. Ein Jahr geht so schnell vorbei, daher präsentiere ich heute die lange versprochene Anleitung.

Heute beginnen wir mit dem Paper Piecing Teil der Blattspitze.

Dazu ladet euch bitte das PDF herunter und druckt es euch aus. Bitte beim Ausdrucken unbedingt beachten, dass bei den Druckeinstellungen "Benutzerdefinierte Einstellungen: 100 %" eingestellt sind.

Today I`ll show you how to sew these leaves. I made a tutorial while I sewed the leaves table runner for my mum. I´ve designed my own pattern to make these leaves but in a very small variation. Last year my mom aksed me if I would make her a new table runner. Something for autumn would be nice.
Ok I sat down at my desk and increased the pattern and I made a lot of pictures for a nice tutorial. It took nearly a yeat to finish the pattern for you, time is always running but here it is, the finished tutorial.

Today we start wit the paper piecing part of the leaf top.

Please download this PDF and print it out. Please take care to print them at 100 %.


Nach dem Ausdrucken bitte noch unbedingt einen Größencheck machen. Wir wollen ja auch die richtige Größe für die Vorlage haben. Hierfür messt einfach die Kontrollkästchen am unteren Rand nach. Wenn diese stimmen, dann könnt ihr mit dem Englisch Paper Piecing loslegen. (Da wir im Patchwork mit verschiedenen Maßeinheiten arbeiten, sind hier sowohl ein Inch und ein cm- Kontrollkästchen abgebildet).

After printing out the pattern be sure to check the size control. You want to have the right size for the pattern. Just meassure the small squares at the bottom of the paper. If they are ok you can start paper piecing. (we use different meassurements in Germany, so you can decide on inches or cm within this pattern)


Wir benötigen:
- 1 Paper Piecing Vorlage
- 1 farbiges Teil ca. 12,5 x 6 cm
- 2 Hintergrundteile ca. 6 x 11 cm

We need:
- 1 paper piecing template
- 1 colored piece of fabric meassuring about 5 x 2,5 inches
- 2 backgroundpieces about 4,5 x 2,5 inches

Benötigtes Material - materials you need

1. Zuerst falten wir die Papiervorlage auf den Linien auf denen wir später nähen. Das gibt uns eine bessere Handhabung beim Nähen auf Papier.

1. Fold the paper on the sewing lines. It gives you more a guide to lay on the fabric later. 

Schritt 1 - Step 1

2. Dann nehmen wir das farbigen Teil und legen es auf die Rückseite des Papiers. Im Gegenlicht kann man deutlich sehen, dass wir alle Kanten, inklusive dem grauen Teils der Nahtzugabe ausfüllen. Hier könnt ihr den Stoff mit einer Stecknadel fixieren.


2. Take the colored fabric piece and place it on the pack of the template. When you hold it against the light you can check that all parts we need are covered, even the grey part of the seam allowance. Fix it with a pin if you like.

Schritt 2 - Step 2
3. Nun falten wir das Papier mit dem Stoff nochmal. Anhand dieser Stofffalte können wir auch auf der Rückseite sehen, wo wir den nächsten Stoff überlappend anlegen müssen.

3. Now we fold the paper with the fabric again, to get a crease in the fabric piece to show us where our seam will go through. There we have to lay down our next piece of faric with the overlap for the seam allowance.

Schritt 3 - Step3

4. Legt den Hintergrundstoff mit ca. 0,5 cm Nahtzugabe über die Falte des farbigen Stoffs und faltet das ganze nochmal auf der Nahtkante. Jetzt könnt ihr sehen, wo ihr ca. nähen werdet. Dadurch könnt ihr einfach kontrollieren, ob ihr genügend Nahtzugabe gelassen habt oder nicht. Wenn alles passt, dann empfehle ich ungeübten Nähern die Nutzung von Stecknadeln, denn Stoff auf Papier rutscht sehr gerne hin und her.

4. Take the background fabric and place it down and give a quarter inch seam overlap for the seam allowance. Fold again on the sewing line. Now you can see where your seam will go and you can check if there is enough seam alowance for the background piece. Everythings ok now - use a pin to hold it in place. If you are an expert sewer you can leave the pins behind.

Schritt 4 - Step 4

5. Jetzt wird genäht. Beim Paperpiecing wird eine 2-er Stichlänge verwendet. Dadurch lässt sich das Papier am Ende leichter entfernen. Wir drehen unser geheftetes Stück so, dass die bedruckte Papierseite nach oben zeigt. Wir nähen genau auf der aufgezeichneten Kante. Wer möchte kann hier am Anfang und am Ende der Naht vernähen, bei diesem einfachen Muster ist das aber kein Muss, da diese Nähte in einer anderen Naht später verriegelt werden.

5. Time for sewing now. With the englisch paper piecing you will sew with a smaller stitchlength. I use the length 2. With the smaller stitches the paper will be perforated better and you will have less problems by removing it later. Now stitch exactly on the line. You can backstitch at the beginning and in the end if you like, but with this small pattern you will close the seam with the next steps later.

Schritt 5 - Step 5

6. Ist die Naht genäht, so sieht das ganze Konstrukt so aus. Kontrolliert hier bitte nochmals die Nahtzugabe auf der vollen Länge der Naht. 

6. Seam finished? Your piece will look like this. Turn around to controll your seam allowance on the full length of the seam.

Schritt 6 - Step 6

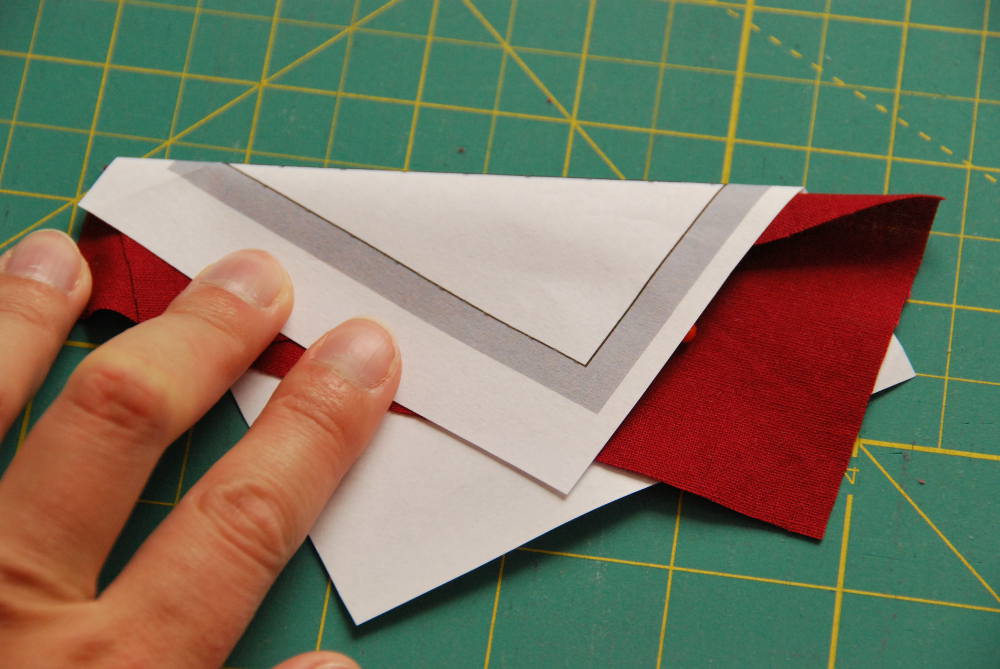
7. Wir drehen es wieder um und lassen die bedruckte Seite der Vorlage nach oben schauen. Jetzt falten wir das Papier auf die Seite und schneiden entweder mit Schere oder Rollschneider die überstehenden Stoffstücke nach der Zugabe einer Nahtzugabe ab.

7. Turn around again and let the printed side look up. Now fold the paper away and cut the outstanding fabric, giving a quarter inch seam allowance. You can use a rotary cutter or siccors.

Schritt 7 - Step 7

8. Wir drehen das Teil wieder um und bügeln den Hintergrundstoff nach außen und stecken ihn fest. So kann er nicht in die nächste Naht hineinrutschen. Dann falten wir wieder und wiederholen die Schritte 3 bis 8 auf der zweiten Seite der Blattspitze.

8. We turn the piece again and give it a nice press and fix the fabric with a pin on the paper. With the pin it won`t get into the next seam. Then we fold on the next seam line and repeat Step 3 to 8 on the other side.

Schritt 8 - Step 8
Wenn ihr den zweiten Durchgang gemacht habt, dann sieht das Teil noch sehr chaotisch und unfertig aus:

The finished part will look very chaotic and unfinished:
Vorderseite - front
 Also drehen wir das Teil wieder um, auf die Rückseite:

Turn around again:

Rückseite - back
9. Jetzt legt das Lineal an und schneidet mit einem viertel inch Nahtzugabe, das sind ca. 6 mm, also am Rand des grauen Bereichs die überstehenden Stoffstücke ab.

9. Now take your ruler and trimm away the rest of the fabric with a quarter inch seam allowance. That is exactly the grey part.

Schritt 9 - Step 9
10. Jetzt wird noch das Papier gefaltet. Jetzt zahlt sich der schmale Stich aus. Das Papier ist dadurch wie vorperforiert. Ein paar mal falten und das Papier lässt sich schön abziehen.

10. Now fold the paper sometimes to rip it off. If you have used the smaller stitch, it will get off very easy.

Schritt 10 - Step 10
Unsere fertige Blattspitze sieht so aus:

That`s the way our finished leaf top looks like:


Und noch ein Bild von vorne. Das ist das schöne beim Paper Piecing. Jedes Teil wird gleich und es gibt klare und gerade Formen vor.

And a last picture from the front. I love the cean and crisp lines that comes with the paper piecing. Each piece gets out the same way and it is really an accurate methode.


So, ich hoffe, ich habe alles anschaulich erklärt und ihr habt Spaß mit dieser Anleitung. In den nächsten Tagen zeige ich Euch dann, wie ihr den Rest des Blattes dazu näht.

Schönen ersten herbstlichen Sonntag euch.

I hope I gave you a nice and easy pattern to sew and hope you will have fun trying out this pattern. Within the next days I`ll show you how to sew the rest of the leaf.

Have a fun and beautiful autumn sunday.

Montag, 31. August 2015

Märchenhochzeiten und romantische Hochzeitsgeschenke

Copyright: N. Rossmann-Michel & H. Michel
Es war einmal, ein verliebtes Paar, welches auf einem traumhaften Schloss Hochzeit feierte.
Auf Schloss zu Hohenstein gaben die beiden sich das Ja-Wort und feierten im romatischen Garten mit ihrer Traugemeinde ein rauschendes Fest.

Ich könnte so noch weitererzählen, aber hier geht es mal nicht um die Hochzeit, sondern um das Hochzeitsgeschenk, das ich den beiden gemacht habe. Jaja, das Hochzeitspaar ist die wichtigste Figur, das steht unumstritten fest, aber hier, auf meinem Blog sind es die beiden Cathedral Window Kissen, die ich den beiden genäht habe:-)
Da wir als Nachbarn des Paares die Katzen gehütet haben und einen Schlüssel hatten, haben wir den beiden eine kleine Überraschung als Willkommensgruß in ihrer Wohnung hinterlassen. Wir haben zwei kleine Banner aufgehängt und roten Dekofaden durch den Flur gespannt. Und ganz nebenbei haben wir die beiden Kissen im Schlafzimmer drapiert.

Once upon a time, a couple in love celebrated a wedding on a beautiful old castle. At "Schloss zu Hohenstein" (a very old and beautiful castle) they said "Yes, I will" and celebrated a romantic and beautiful wedding.

I can tell more like that, but now, the wedding isn`t the most important thing it is my wedding present I gave to the couple.  Ok, the fresh married couple is always the most important character in such a story, I do not want to deny that, but here on the blog, my two cathedral window cussions als most important:-)
As the neighbors of the couple we did the catsitting during the wedding weekend and for that, we have the key. So we left a small surprise in their flat. We dekorated the corridor with a red band and some small banner. And with that, we draped the two cussions in the sleeping room.
 
Copyright: N. Rossmann-Michel & H. Michel

Die Wohnung der beiden ist sehr im Landhausstil eingerichtet und da passen so edle Kissen perfekt hinein. Vielen Dank an dieser Stelle an das Paar, dass Sie mir diese wunderschönen Bilder zur Verfügung gestellt haben.

The flat of them is really a country house style and these special cussions fit perfect into the flat. Many Thanks to the couple that gave me the permission to use these excellent pictures.
 
Copyright: N. Rossmann-Michel & H. Michel
Nun aber zu den Nähdetails.
Die Kissen sind nicht mit der traditionellen Cathedral Window Methode genäht, sondern nach der "Quick and Easy" Methode von Jenny Doan von der Missouri Star Quilt Company. So super einfach, ehrlich. Man spart sich ca. 70 Prozent der ganzen Bügelarbeiten nach ihrer Methode und ich finde, sie erscheint ebenso plastisch und akkurat wie mit der alten Methode. Natürlich hängt das auch immer davon ab, wie akkurat man/frau arbeitet, das erklärt sich aber von selbst.

Die Zusammensetzung nach Jennys Methode:
8 x 8 / 2,5 Inch Hintergrundquadrate mit jeweils zwei gebügelten weißen Dreiecken drauf.  Hier wird dann bereits durch die Anordnung der Dreiecke das Muster ersichtlich und definiert. Dazu kommen die Fensterquadrate in der Kontrastfarbe. Allein das Cathedral Window Muster in der Mitte misst ca. 16 inch (40 cm.) Dann habe ich ein 3 inch breites Binding angesetzt und dahinter ein dünnes Volumenflies gelegt. Am Ende wir das Kissen auf 20x20 Inch (50x50 cm) zurückgeschnitten. Jetzt noch einen versteckten Reisverschluss auf der Rückseite einnähen und das Binding annähen, fertig ist das Kissen.


And now off to the sewing details:
The cussions aren`t sewn with the traditional Cathedral Window Methode, I used the "Quick and Easy" methode of Jenny Doan from Missouri Star Quilt Company. So super easy, I can tell you. You save about 70 percent of your ironing time by using Jenny`s methode and it is so accurate and plastic like using the old methode. Sure, it depends on how accurate you sew, but that is normal, isn`t it?

The setting with Jenny`s methode:
you use 8 x 8 / 2,5 inch backgroundsquares with two ironed white triangles on each backgroundsquare. By sorting the triangles you can define the pattern of the cussion and the way it should look in the end. Later on you add the window squares. The pattern itself in the middle meassures 16 inches. Then i added a 3 inch binding and a thin fussible web behind it. After that I squared it up to 20 inches. Now it is time to add the background with an invisible zipper and finish the cussion with a binding. Finished with the cussion.

Ich wünsche dem frisch vermählten Paar wunderschöne Tage und tolle Flitterwochen.
All the best and beautiful days is what I wish to the couple and beautiful honeymoons.

Freitag, 28. August 2015

Nur Hexagons im Kopf - only hexagons in my brain


Die Überschrift sagt ja eigentlich schon alles. Derzeit dreht sich bei mir alles nur um Hexagons. Ich muss sagen, diese Teile machen echt süchtig. Merkwürdigerweise wird man nirgends auf diese Nebenwirkung hingewiesen. Keine Warnaufkleber auf Hexagonanleitungen zu finden, auch gibt es keine Studien darüber, dass diese Technik süchtig macht. Überall kann man Anleitungen herunterladen, sieht neue wunderschöne Quilts, Taschen und mehr aber man vermisst die Warnhinweise. "Achtung, Englisch Paper Piecing mit Hexagons macht süchtig!" So einen Hinweis sollte man eigentlich anbringen. Denn nun stecke ich mitten drin. Ganz ehrlich, nicht nur, dass diese Muster mit dieser coolen Form einfach nur Hammer sind, das vorbereiten, sammeln und zusammennähen macht auch noch Spaß. Ein Tag ohne ein paar Hexagons am Abend ist kein guter Tag...

The headliner is telling everything, doesn`t it? At the moment there is no room for anything else than hexagons. I have to say, these tiny hexagons are addictive. But somehow you can find no warnings in patterns or blogs that work with hexagons. No signs of danger to be addictive anywhere. No studies about hooking on hexagons and the technic. You can get patterns everywhere, see wunderful new quilts, bags and more but you miss the warnings. "Attention, englisch paper Piecing can lead to addiction!" Normally you should have some signs with the patterns. And now, I`m right in the middle of that. Serious, I love the quilts with these great vibrant patterns, the cool form of the hexagons and I love love to baste, prepare and sew these beauties together. One day without a hexagons is not a good day...


Ok, das nur mal als kleinen Auszug aus dem Alltag einer Hexagonsüchtigen:-) Ich kann auch mal einen Tag ohne Hexagons, aber in letzter Zeit habe ich die immer und überall dabei, eine tolle Beschäftigung, während man am See in der Sonne liegt oder auf dem Balkon einen Kaffee trinkt oder Abends auf dem Sofa sitzt und nur Sch... in der Glotze läuft.
Wir ihr seht, hat sich meine fleißige Lieselei ausgezahlt und ich habe die dritte Runde komplett fertig.

Just a small essay about beeing addicted to hexagons:-) I can live without hexagons, but at the last few days I had them everywhere with me. Great to sew sitting in the sun at the lake or on the balkony drinking a coffee or in the evening when there is nothing good on TV. 
You can see the progress of my sewing, I already finished the third round completly.


Seit ca. 2 Wochen bin ich nun am Vorbereiten, schnippeln, heften und sortieren für die nächste Runde. Ganz sicher bin ich über die Farbgebung noch nicht, aber die Grundrichtung ist ja schon mal klar und dann kann ich beim Heften noch schön überlegen, wie ich weiter vorgehen möchte. Denn brauchen werde ich diese Teile in rauen Mengen.

Der Quilt wird am Ende über 17.000 Teile verarbeitet haben und ich habe derzeit erst ca. 2.700 zusammengenäht. Krass. Eigentlich ist das doch verrückt. Aber wie gesagt, irgendwie ist es auch eine Sucht und dann macht man auch was Verrücktes. Schönen Freitag euch.

Ihr müsst den Text übrigens mit einem Lächeln lesen, ist nicht so ganz ernst gemeint;-)

Since two weeks I`m busy preparing , basting and sorting my hexagons for the next round. I`m not shure in what color theme i will work next but. the basics are already fix and I will need a lot of them, so I can think about it while I`m busy preparing.

This quilt will include more than 17.000 hexagons and I`ve already sewn 2.700. Crazy. This is absolutly crazy, but somehow it is an addiction and when you are addicted, you need to do some crazy stuff. Have a fun friday.

you need to read the text smiling, I do not mean that completly serious;-)