Montag, 19. Oktober 2015
Weihnachten naht - christmas is coming
Voila, mal nix genähtes. Ich habe das Wochenende damit verbracht Papier zu schneiden, zu rollen und zu kleben. Rausgekommen ist dieser tolle Weihnachtskranz aus bedrucktem Papier mit Weihnachtskugeln in der Mitte. "Was, Weihnachten? Jetzt schon?" Hmm, ja. In den letzten Tagen wurde mir aufgrund des kaltnassen Novemberwetters welches wir seit einer Woche haben richtig weihnachtlich zumute. Zudem habe ich schon das erste Weihnachtsgeschenk fertig und da hat das eben gepasst. Aber ganz so schlimm ist es noch nicht. Die Weihnachtsmusik schläft noch im CD-Regal und auch den ersten Glühwein hebe ich mir noch auf. Sonst schmeckt das ja an Weihnachten nicht mehr.
Gebastelt habe ich nach einer Anleitung von Jenna DeAngeles. Hier findet ihr das Video auf Youtube, wenn ihr ebenfalls einen Kranz aufhängen wollt. Diese Dame verwendet zum Basteln dieses Kranzes alte Seiten aus einem Buch. Da ich aber keine derart alten Bücher besitze und diese mit dann auch wirklich für so etwas zu schade sind, habe ich elfenbeinfarbenes Papier gekauft und das bedruckt. Als Druck habe ich ein Weihnachtslied auf beide Seiten kopiert.
Voila, today nothing made of fabric or nothing sewn. I spend my weekend cutting, wrapping and gluing paper. I finished with this beautiful paper wreath filled with christmas balls in the middle. "What? Christmas? Now?" Ähmmm yes. The cold, grey and rainy weather within the last days made me feel very christmaslike. And I finished the first present so it was the perfect theme to work with. But it isn`t that bad as it sound. My christmas musik sleeps in the cd-board and I didn`t heated up my first glas of Glühwein yet. Have to save that for later.
I made this wreath with the videotutorial of Jenna DeAngeles. If you want to make your own - click here for the video. Jenna uses old pages of an old antique book for the wreath. I do not own such old books and if I would own some I wouldn`t use them for such a project. So I bought darker creme paper and printed a christmas song on both sides. That looks similar.
Hier das Zetrum des Kranzes. Ich habe billige Plastikkugeln im Keller gefunden und diese dann mit Heißkleber in der Mitte fixiert. Das gibt dem ganzen nochmal etwas Glitzer und das gewisse Etwas finde ich.
For the center of the wreath I glued in some cheap balls made of plastic I found in my basement. I used hot glue for the whole project. The balls add something special and gives a nice glitter to it.
Na ja. laut Anleitung hätte ein Kranz aus 120 Blättern bestehen sollen. Nachdem ich aber den ersten Kranz fertig hatte, hatte ich noch ca. 30 Blätter übrig. Wegschmeißen? Neee, ich hab daher noch schnell einen zweiten Kranz gemacht. Diese Schönheit ziert nun meine Eingangstür zu unserer Wohnung und begrüßt unsere Gäste ganz elegant. Auch hier habe ich ein paar Kugeln in die Mitte geklebt. Das hat mir einfach gut gefallen.
So, das wars für Heute.
The big wreath should be made of 120 sheets of paper. Somehow I was finished with the first one and I had about 30 cones left over. Throw it away? - Nooooooo, I made another smaller wreath. This beauty is hanging on the door to my flat. I added some balls here too, I love the look.
ok, that`s it for today.
Sonntag, 4. Oktober 2015
Black an Color - a new Quilt
Ein weiterer Quilt ist fertig geworden. Dieser Quilt geht hoffentlich bald an einen kleinen neuen Erdbewohner, der es im November schön warm und kuschelig haben will. Eigentlich liegt dieses Quilttop bereits seit Februar 2014 bei mir im Nähzimmer. Jedoch konnte ich mich nicht entscheiden, was ich damit machen sollte. Ich habe damals ein neues Projekt angefangen mit den restlichen Basic Jelly Roll Streifen einer "Color me happy" Jelly Roll von Vanessa Christenson. Da das wirklich tolle Farben sind und ich aber insgesamt zu wenig Streifen hatte, dachte ich, ich mache einen kleinen Quilt daraus. Irgendjemand im Bekanntenkreis wird schon demnächst ein Baby kriegen. Es hat etwas gedauert, aber bald bekommt dieser Quilt einen neuen Besitzer, der mit ihm kuschelt.
Another Quilt finished. This baby size will go to a new human on earth soon. He will have it cozy and warm in novembertime. This Quilttop has been in my sewing room since February 2014. I couldn`t decide what to do with this top. I started a new project over a year ago to work on the rest of some strips of a jelly roll from vanessa christensons "color me happy" line. I had the basic stripes as leftovers but there were not too many stripes left, so I decided to go on a baby size. One of my friends will soon have a baby I thought. Well it took over a year to pull this out of the closet and finish it. now it is time to snuggle in.
Dieser Quilt misst 33 x 43 Inch, das sind ca. 105 x 84 cm. Eine schöne kleine Babyquiltgröße. Genäht ist dieses Quilttop Ruck zuck, also so fast an einem Abend. Die hellen Farben, kombiniert mit dem Schwarz lassen die Farben so richtig hervorblitzen, das gefällt mir sehr gut.
This quilt measures abut 33 x 43 inches. A nice baby size. I made the quilttop nearly in one evening. This methode goes so fast, love it. And these bright colors really pop with the black background.
Gefüttert ist dieser Quilt mit normalem Fließ und als Bonus, zum megakuschelig werden, habe ich die Rückseite aus Flanell gestaltet. Zusammen mit dem Fließ ist dieser Quilt super kuschelig und wärmt total angenehm, das habe ich gemerkt als ich ihn beim Binding annähen über den Beinen hängen hatte. Warm macht dieser Quilt sehr effektiv.
I basted the quilt with normal batting and added a cozy flanell backing to make it super cozy. The combination of batting and flanell is great, it is cozy and it really warms a lot. I tried the cozyness while I added the binding - sooo warm and cozy.
Gequiltet habe ich diesen Quilt in großen, schräg angesetzten Quadratraster, großflächig, damit die Decke schön weich bleibt. Außerdem spricht das Muster für sich selbst und wird durch das Quilting nur ein wenig unterstützt.
So. Und als nächstes Projekt kommen bereits ein paar Weihnachtsgeschenke und etwas Herbstdekoration unter die Nähnadel.
Ich wünsche euch einen wunderschön verregneten ersten Oktobersonntag. Perfekt um drin an der Maschine zu sitzen, Musik oder Hörspiele zu hören, oder sich auf die Couch zu kuscheln. Auf geht`s gehen wir es an:-)
I quiltet it in a big raster with squares, diagonal through the quilt, but not to small, to keep the cozyness of the quilt. The pattern really comes up with the quilting and it adds a nice texture to it.
For the next projects I will sew some christmas presents and decoration for autumn.
I wish you a nice rainy first oktober sunday. Perfect to sit down at the mashine, listen to music or some telling stories or just snuggle on the couch. Get off - let`s do it.
Sonntag, 20. September 2015
Blätter nähen Teil 2 - Sew leaves part 2 (Tutorial)
Heute gibt es den zweiten Teil der Anleitung für den Tischläufer mit den Herbstblättern drauf.
Die Anleitung für die Englisch Paper Piecing Methode bei der Blattspitze findet ihr hier.
Viel Spaß beim nähen.
Hier ist sie:
Für ein Blatt in der Größe 17 cm im Quadrat braucht ihr:
- Paper-Piecing-Vorlage für die Blattspitze (PDF)
- Lineale
- Rollschneider
- Schere
- Bleistift oder einen auswaschbaren Stift
- Hintergrundstoff
- eine Auswahl an verschiedenen herbstlichen Farben
Today I`ll show you he second part of the tutorial on how to sew these autumn leaves.
The tutorial with the englisch paper piecing methode for the leaf top can be found here.
Now have fun with sewing.
Here it is.
You need this stuff to make a leaf in 6 3/4 inch square:
- Paper-Piecing-pattern for the tipp of the leave (PDF)
- rulers
- rotary cutter
- siccors
- a water soluble pen
- backgroundfabric
- a bunch of colors you like to use for autumn (mine are orange, green, yellow and a dark red.)
Zuschneiden für die Blattspitze:
- von Hintergrundstoff 2 Rechtecke
- von der Farbe 1 Rechteck
Für den Rest des Blattes:
- 1 Quadrat in Farbe à 4 x 4 cm
- 6 Rechtecke in Farbe à 7 x 4 cm
- 6 Rechtecke in der Hintergrundfarbe à 7 x 4 cm
- 2 Rechtecke in der Hintergrundfarbe à 9 x 6 cm
- 1 Quadrat in der Hintergrundfarbe à 8 x 8 cm
Ihr beginnt mit der Paper-Piecing Vorlage. Diese wird mit zwei Hintergrundteilen und dem farbigen Teil benäht, mit Nahtzugabe ausgeschnitten und das Papier abgezupft.
Diese Anleitung sollte mit einer Viertel Inch Naht genäht werden. Das sind ca. 6 mm. Macht euch einen Tesa an die Maschine oder nutzt einen Quarter Inch Nähfuß. Wer diese Anleitung mit einer anderen Nahtzugabe näht, muss damit rechnen, dass das Blatt am Ende nicht zusammen passt.
Cutting for the leaf top, the square in the left corner with the brown top:
- 2 rectangles in your background color.
- 1 rectangle of the top color you want to use
For the rest of the leaf:
- one 1 5/8 x 1 5/8 " square in color
- six rectangles in color 2 3/4 x 1 5/8 "
- six rectangles in backgroundfabric 2 3/4 x 1 5/8 "
- two rectangles in backgroundfabric 3 5/8 x 1 5/8 "
- one square with backgroundfabrig 3 1/4 x 3 1/4 "
Please start with the Paper Piecing Part first. You are going to add two background pieces and one colored piece. Trimm down to size with seam allowence and ripp off the paper.
Only use a quarter inch seam allowance. If not it can be possible that the leaf will not fit together.
| Layout |
Now layout the pieces like you see on the picture and choose the position of your colors. best time to check if you forgot to cut something.
Für den nächten Schritt nehmt alle farbigen Teile, wo auf diesem Foto der leere Platz mit "Links" beschrieben ist. Das sind die Teile, die an der linken Seite die lange Spitze bekommen.
Next step: take all the pieces where I note "Links" (translation=left) in the picture on the empty place. These are the pieces that get their long point on the left side.
Zu den farbigen Blattteil kommt ein Hintergrundteil. Dieses legt ihr Kante auf Kante wie im obigen Bild zu sehen auf den farbigen Teil. Mit einem Lineal und einem Stift markiert ihr diagonal die Nählinie von Ecke zu Ecke.
Auf dieser Linie näht ihr dann auch euer Teil zusammen. Wer möchte, kann diesen Schritt mit Stecknadeln fixieren.
Add a backgroundpiece to the colored one like it is shown in the picture above. Use a ruler and a water-soluble pen to mark your stich line diagonal from corner to corner. Stich a quick seam on this line. You can add pins to fix it while sewing.
Anschließend schneidet ihr das überschüssige "Dreieck" ab. Das könnt ihr mit dem Rollschneider machen oder mit der Schere, so wie ich. Bitte nur so viel abschneiden, dass ungefähr die Nahtzugabe 0,5 mm eingehalten wird. Gebügelt wird in Richtung Hintergrund.
Now trimm the corner. You can use siccsor or ruler and rotary cutter if you like to. Be sure to leave a quarter inch seam allowence. Iron towards the background.
Diese Schritte wiederholt ihr mit den drei übrig gebliebenen Teilen für die längere Spitze auf der rechten Seite. Hier den Hintergrund genau gegengesetzt annähen. Ebenfalls den überschüssigen Stoff abschneiden und eine Nahtzugabe stehen lassen. Ebenfalls Bügeln, aber diesmal in Richtung Farbe.
Repeat these steps with the pieces for with the long point on the right side. I wrote "rechts" (translation= right) in the empty places for the pieces that get the long right side. Piece the background in the opposite way like it is shown in the picture. This time you iron towards the color.
So sollte euer Blatt bis jetzt dann aussehen. Der größte Teil ist geschafft. Jetzt kommen die Zusammennäharbeiten, siehe Bilderfolge:
Now your leaf should look like this. The hard part is done. Now you need to assemble the block like you can see it in the following pictures:
1. Zuerst näht ihr die obere Reihe zusammen. Möglichst alles am unteren Rand orientieren. Danach näht ihr die schmalen Teile in Reihe zwei zusammen. In der Unteren, der dritten Reihe, zuerst Blöcke bilden.
2. Nach diesem Schritten seht ihr auf Bild 2 wie es aussehen sollte.
3. Bitte die Kanten wenn nötig etwas gerade abscheiden. Nicht zu viel abscheiden. Auf Bild drei seht ihr das Ergebnis dieses Schritts.
4. In Reihe drei bitte die beiden Blöcke zu einer Reihe verbinden.
5. Nun näht ihr, eine nach der anderen, die Reihen zusammen.
So sieht der Block anschließend aus. Nun an den zwei Quadraten, also dem "Nähen auf Papier-Quadrat" und dem Hintergrundquadrat das Lineal anlegen und den Block auf 17 cm zurückschneiden, sauberschneiden oder versäubern.
1. Sew the first row together. Try to sew a straight line on the under line of the row. Then you sew the thin line together. And in the end you sew the two blocks in the third row together.
2. After these steps yo see on the second picture how it should look like.
3. Please trimm down some edges if nessesary. Not to much. On picture three you can see how it should look like.
4. Sew the two block of row three together.
5. Now finish the block by sewing the rows together. Take care that all seams match together.
And that`s how the block should look like in the end. Now you can lay on your ruler on the leaftop you sewed with the epp-methode and trimm down the block to 6 3/4 inch.
Fertig ist euer Blatt.
Wer will kann beim Quilten dann entgegen der Blattspitze noch einen Stil quilten. Mit einem passenden Faden oder mit einem etwas dickeren Stickgarn kann man dann auch hier noch einen tollen Effekt erzielen.
Viel Spaß damit und schöne Herbstvorbereitungen;-)
Your leaf is finished.
Everybody who wants to have a leaf stalk with his leaf can add one while quilting the finished object. or you can stitch with a decoration thread and give it a great look.
Have fun with this tutorial and I wish you a great time preparing for autumn.
Sonntag, 6. September 2015
Einfaches Paper Piecing, Blätter Teil 1 - Easy paper piecing, leaves Part 1
Heute gibt es eine schöne, mit vielen Bildern ausgestattete Anleitung für euch. Ich habe bereits vor drei Jahren diese Blätter entworfen, allerdings in einem sehr kleinen Format. Meine Mutter kam letztes Jahr auf mich zu und fragte, ob ich ihr einen weiteren Tischläufer, nicht breiter als 25 cm, nähen kann, ein herbstliches Motiv wäre sehr schön.
Ok. Ich habe mich hingesetzt und das Blättermotiv vergrößert und während des Nähens viele Bilder für eine Anleitung gemacht. Ein Jahr geht so schnell vorbei, daher präsentiere ich heute die lange versprochene Anleitung.
Heute beginnen wir mit dem Paper Piecing Teil der Blattspitze.
Dazu ladet euch bitte das PDF herunter und druckt es euch aus. Bitte beim Ausdrucken unbedingt beachten, dass bei den Druckeinstellungen "Benutzerdefinierte Einstellungen: 100 %" eingestellt sind.
Today I`ll show you how to sew these leaves. I made a tutorial while I sewed the leaves table runner for my mum. I´ve designed my own pattern to make these leaves but in a very small variation. Last year my mom aksed me if I would make her a new table runner. Something for autumn would be nice.
Ok I sat down at my desk and increased the pattern and I made a lot of pictures for a nice tutorial. It took nearly a yeat to finish the pattern for you, time is always running but here it is, the finished tutorial.
Today we start wit the paper piecing part of the leaf top.
Please download this PDF and print it out. Please take care to print them at 100 %.
Nach dem Ausdrucken bitte noch unbedingt einen Größencheck machen. Wir wollen ja auch die richtige Größe für die Vorlage haben. Hierfür messt einfach die Kontrollkästchen am unteren Rand nach. Wenn diese stimmen, dann könnt ihr mit dem Englisch Paper Piecing loslegen. (Da wir im Patchwork mit verschiedenen Maßeinheiten arbeiten, sind hier sowohl ein Inch und ein cm- Kontrollkästchen abgebildet).
After printing out the pattern be sure to check the size control. You want to have the right size for the pattern. Just meassure the small squares at the bottom of the paper. If they are ok you can start paper piecing. (we use different meassurements in Germany, so you can decide on inches or cm within this pattern)
Wir benötigen:
- 1 Paper Piecing Vorlage
- 1 farbiges Teil ca. 12,5 x 6 cm
- 2 Hintergrundteile ca. 6 x 11 cm
We need:
- 1 paper piecing template
- 1 colored piece of fabric meassuring about 5 x 2,5 inches
- 2 backgroundpieces about 4,5 x 2,5 inches
| Benötigtes Material - materials you need |
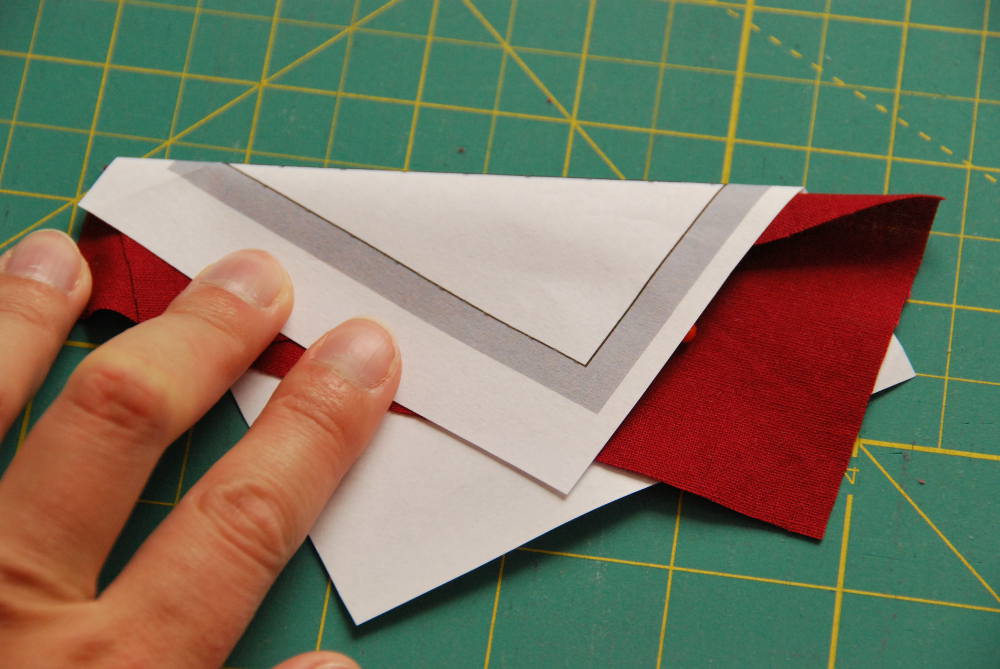
1. Zuerst falten wir die Papiervorlage auf den Linien auf denen wir später nähen. Das gibt uns eine bessere Handhabung beim Nähen auf Papier.
1. Fold the paper on the sewing lines. It gives you more a guide to lay on the fabric later.
| Schritt 1 - Step 1 |
2. Dann nehmen wir das farbigen Teil und legen es auf die Rückseite des Papiers. Im Gegenlicht kann man deutlich sehen, dass wir alle Kanten, inklusive dem grauen Teils der Nahtzugabe ausfüllen. Hier könnt ihr den Stoff mit einer Stecknadel fixieren.
2. Take the colored fabric piece and place it on the pack of the template. When you hold it against the light you can check that all parts we need are covered, even the grey part of the seam allowance. Fix it with a pin if you like.
| Schritt 2 - Step 2 |
3. Now we fold the paper with the fabric again, to get a crease in the fabric piece to show us where our seam will go through. There we have to lay down our next piece of faric with the overlap for the seam allowance.
| Schritt 3 - Step3 |
4. Legt den Hintergrundstoff mit ca. 0,5 cm Nahtzugabe über die Falte des farbigen Stoffs und faltet das ganze nochmal auf der Nahtkante. Jetzt könnt ihr sehen, wo ihr ca. nähen werdet. Dadurch könnt ihr einfach kontrollieren, ob ihr genügend Nahtzugabe gelassen habt oder nicht. Wenn alles passt, dann empfehle ich ungeübten Nähern die Nutzung von Stecknadeln, denn Stoff auf Papier rutscht sehr gerne hin und her.
4. Take the background fabric and place it down and give a quarter inch seam overlap for the seam allowance. Fold again on the sewing line. Now you can see where your seam will go and you can check if there is enough seam alowance for the background piece. Everythings ok now - use a pin to hold it in place. If you are an expert sewer you can leave the pins behind.
| Schritt 4 - Step 4 |
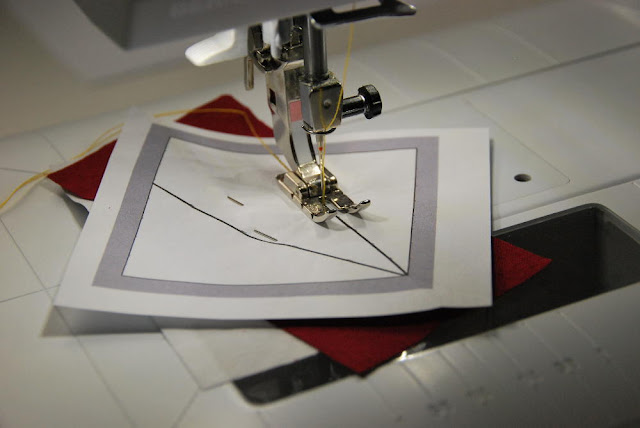
5. Jetzt wird genäht. Beim Paperpiecing wird eine 2-er Stichlänge verwendet. Dadurch lässt sich das Papier am Ende leichter entfernen. Wir drehen unser geheftetes Stück so, dass die bedruckte Papierseite nach oben zeigt. Wir nähen genau auf der aufgezeichneten Kante. Wer möchte kann hier am Anfang und am Ende der Naht vernähen, bei diesem einfachen Muster ist das aber kein Muss, da diese Nähte in einer anderen Naht später verriegelt werden.
5. Time for sewing now. With the englisch paper piecing you will sew with a smaller stitchlength. I use the length 2. With the smaller stitches the paper will be perforated better and you will have less problems by removing it later. Now stitch exactly on the line. You can backstitch at the beginning and in the end if you like, but with this small pattern you will close the seam with the next steps later.
| Schritt 5 - Step 5 |
6. Ist die Naht genäht, so sieht das ganze Konstrukt so aus. Kontrolliert hier bitte nochmals die Nahtzugabe auf der vollen Länge der Naht.
6. Seam finished? Your piece will look like this. Turn around to controll your seam allowance on the full length of the seam.
| Schritt 6 - Step 6 |
7. Wir drehen es wieder um und lassen die bedruckte Seite der Vorlage nach oben schauen. Jetzt falten wir das Papier auf die Seite und schneiden entweder mit Schere oder Rollschneider die überstehenden Stoffstücke nach der Zugabe einer Nahtzugabe ab.
7. Turn around again and let the printed side look up. Now fold the paper away and cut the outstanding fabric, giving a quarter inch seam allowance. You can use a rotary cutter or siccors.
| Schritt 7 - Step 7 |
8. Wir drehen das Teil wieder um und bügeln den Hintergrundstoff nach außen und stecken ihn fest. So kann er nicht in die nächste Naht hineinrutschen. Dann falten wir wieder und wiederholen die Schritte 3 bis 8 auf der zweiten Seite der Blattspitze.
8. We turn the piece again and give it a nice press and fix the fabric with a pin on the paper. With the pin it won`t get into the next seam. Then we fold on the next seam line and repeat Step 3 to 8 on the other side.
| Schritt 8 - Step 8 |
The finished part will look very chaotic and unfinished:
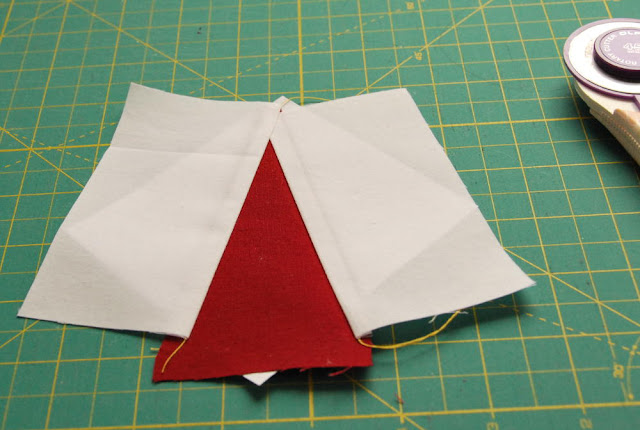
| Vorderseite - front |
Turn around again:
| Rückseite - back |
9. Now take your ruler and trimm away the rest of the fabric with a quarter inch seam allowance. That is exactly the grey part.
| Schritt 9 - Step 9 |
10. Now fold the paper sometimes to rip it off. If you have used the smaller stitch, it will get off very easy.
| Schritt 10 - Step 10 |
That`s the way our finished leaf top looks like:
Und noch ein Bild von vorne. Das ist das schöne beim Paper Piecing. Jedes Teil wird gleich und es gibt klare und gerade Formen vor.
And a last picture from the front. I love the cean and crisp lines that comes with the paper piecing. Each piece gets out the same way and it is really an accurate methode.
So, ich hoffe, ich habe alles anschaulich erklärt und ihr habt Spaß mit dieser Anleitung. In den nächsten Tagen zeige ich Euch dann, wie ihr den Rest des Blattes dazu näht.
Schönen ersten herbstlichen Sonntag euch.
I hope I gave you a nice and easy pattern to sew and hope you will have fun trying out this pattern. Within the next days I`ll show you how to sew the rest of the leaf.
Have a fun and beautiful autumn sunday.
Abonnieren
Posts (Atom)